

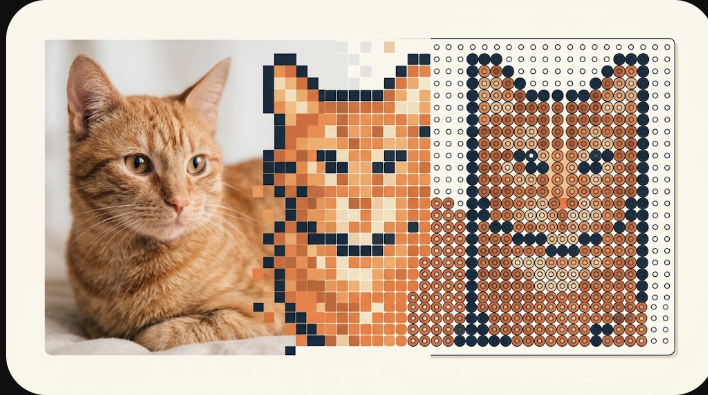
To turn a photo into a bead pattern you pick a grid width, let the tool sample the photo into that grid, then check the colors and counts before you commit to it. In the pattern maker, you upload a JPG, PNG or WebP (up to 15 MB), set a width — the demo starts at 29 beads across — and press Create preview. The image is matched to a palette and drawn as an editable grid. Nothing is uploaded to a server; the picture is processed in your browser.
The six steps, start to finish
Every conversion follows the same path. Knowing the whole path makes it obvious which knob to turn when a result is wrong.
- Choose an input. A photo (or a short piece of text). The demo ships with an orange tabby you can use to follow along.
- Crop. Set the area of the photo that becomes the grid. Everything outside the orange outline is ignored.
- Set a width and a color ceiling. Width is in beads; Max colors caps how many shades the new grid may use.
- Generate. The tool samples the cropped area into a grid of beads. The very first result is applied straight to the middle, so you see it immediately.
- Refine. Change the size or colors and generate again — this time the new result previews in place, with Apply and Discard, so you can compare before it replaces your work.
- Keep it. Apply the version you like, then export it. A single Undo restores the previous version if you change your mind.
After that first result, nothing new replaces your pattern until you apply it — so you can always experiment without losing what you have.
What “sampling” really means
Every cell in the grid becomes one bead, and each cell is filled with the single palette color that sits closest to the photo underneath it. The important detail is how “closest” is measured. BeadDraft converts every color into a perceptual color space (OKLab) and compares distances there, rather than in raw RGB. Raw RGB distance treats a dark navy and a dark brown as further apart than your eye does, and it treats two greens your eye can barely separate as miles apart. Comparing in a perceptual space picks matches that look right, not matches that only look right to the arithmetic.
The practical upshot: skin tones, shadows and near-blacks land on sensible beads instead of jumping to a garish neighbor. You will still get the occasional surprise — a color you did not expect in a shadow — but it is usually the honest closest match, not a bug.
The rule that saves eyes and outlines
Small dark details are the first thing a naive converter loses, because there are so few dark pixels that they get out-voted. BeadDraft has a specific guard for this: when four or more colors are in play, it deliberately keeps the single darkest shade it sampled, even if that shade is rare. That one rule is what protects a cat’s pupils, a nostril, or a thin outline from being averaged into the color beside it.
It also tells you something useful: if the eyes of your subject vanish, try nudging Max colors up to four or more before anything else. Below four colors, the guard does not apply and fine dark marks are fair game for the palette budget.
Width, height and the 120 limit
You set the width in beads. The height is not a separate slider — it follows the crop, so a wide crop makes a short grid and a square crop makes a square one. Both dimensions are capped at 120. A grid wider than that is not refused quietly; the option is skipped and you are told, rather than handed a pattern nobody could reasonably bead. The tool also refuses images beyond roughly 24 megapixels and files over 15 MB, both to protect your browser’s memory rather than for quality reasons.
Width is the single biggest decision, because it sets how much of the picture has to fit into each row:
| Grid width | Columns for the whole image | Good for |
|---|---|---|
| 29 (demo default) | 29 | A face, a symbol, one clear subject |
| 58 | 58 | A subject with a simple background |
| 87 | 87 | Small text or fine features that must stay legible |
| 120 (max) | 120 | Large, detailed scenes you plan to assemble in sections |
A worked example
Take the demo tabby at 29 beads wide with a roughly square crop. That is a 29 × 29 grid — 841 cells, exactly one board section. Not all 841 are beads: with the background left in, most cells are filled; if you preview plain-background removal on a flat backdrop, the corner region drops out and the bead count falls to whatever the subject occupies. The materials panel shows the real number for the version you have applied, color by color, so you are never guessing what to buy.
Now widen to 58. The grid becomes 58 × 58 — 3,364 cells and four board sections. Same photo, same crop, four times the beads and four times the time. That jump is the single most important instinct to build, and it is the subject of the pattern-size guide.
Where a photo stops being useful
Any detail smaller than one bead is gone — there is nowhere to put it. A 29-wide grid has 29 columns for the entire width of the image, so eyelashes, fine text or a distant face in a group shot will not survive. The fix is not a bigger photo; a 4,000-pixel image and a 400-pixel image collapse to the same 29 columns. The fix is a tighter crop or a wider grid. Before you generate, it is worth reading how to prepare a photo so the subject is large enough to read once it is shrunk, and so the background does not fight the subject for beads.
How previewing works
The first result of a fresh session is applied straight away — there is nothing to protect yet, so you should not have to confirm an empty starting grid. After that, a single new result previews right in the middle, labelled “not applied”, with Apply and Discard beside it; your confirmed pattern, its bead list and any export stay exactly as they were until you apply. When you ask for several size options at once, they open in a side-by-side compare panel instead, with real counts attached. Either way, applying never loses the previous version — a single Undo brings it back, because every applied version gets its own identity rather than a reusable number.
After the grid appears
Two things usually come next: deciding the size in beads (and therefore in centimeters and in time), and cutting down the color count without wrecking the details. Both have their own guides — choosing a pattern size and reducing colors. You can also paint, fill and erase single cells by hand, protect the details you care about, and only then simplify. When the grid looks right, open the pattern maker and export a printable chart, a bead list and an editable backup.